디지털 포렌식(digital phosency)은 정보보안 분야에서 가장 흥미로운 분야 중 하나이다. 이 게시물에서는 디지털 포렌식이라는 것이 무엇인지 살펴보고 강력한 도구와 유틸리티를 사용하여 디지털 포렌식 작업을 수행하는 방법에 대해 알아본다.

이 기사에서는 다음 사항을 살펴보기로 한다.
- 디지털 포렌식 기본 원리
- 디지털 포렌식 랩
- 네트워크 증거 수집 및 분석
- 호스트 기반 증거 수집 및 분석
- 포렌식 이미징
- 실습: 부검 포렌식 브라우저
- 실습: 변동성을 고려한 메모리 분석
디지털 포렌식 기본 원리
실습실에 들어가기 전에 많은 중요한 용어들을 설명하는 것이 필수적이다. 첫째, 디지털 포렌식이란 무엇인가?
NIST는 포렌식을 다음과 같이 설명하고 있다.
_ 포렌식 수행의 가장 일반적인 목표는 해당 사건과 관련된 사실을 찾아 분석함으로써 관심 사건에 대한 이해를 높이는 것이다. 법적 절차와 내부 징계를 위한 증거 수집, 악성코드 사고 및 비정상적인 운영 문제 처리 등 여러 가지 상황에서 포렌식 조사가 필요할 수 있다. _
다른 방법론적 조작과 마찬가지로 컴퓨터 법의학 분석은 다음과 같이 잘 정의된 단계를 거친다. 식별, 보존, 수집, 검사, 분석 및 프레젠테이션.
다음 단계를 하나씩 살펴봅시다.
- 식별
- 보존
- 컬렉션
- 시험
- 분석
- 프리젠테이션
세계 시스템에 따르면:
"연쇄는 컴퓨터 포렌식 검사관이 그 물건을 소유하게 된 시점부터 소유주에게 다시 공개될 때까지 증거를 추적하는 법 집행기관으로부터 빌린 문서다. "
다음 그림은 일련의 보관 템플릿을 보여준다.

디지털 포렌식 랩
디지털 포렌식 작업을 하려면 당연히 연구실을 준비해야 한다. 필요한 하드웨어와 소프트웨어를 모두 갖추는 것이 필수적이다.
하드웨어
조사 기간 동안 디지털 포렌식 전문가들은 RAM과 스토리지 미디어 장치를 포함한 많은 하드웨어 부품과 장치를 다루고 있다. 따라서 작업을 양호한 상태로 수행하기에 적합한 하드웨어 장비를 확보하는 것이 중요하다. 필요한 하드웨어 부품 중 일부는 다음과 같다.
- 필요한 디지털 포렌식 도구가 포함된 OS가 포함된 디지털 포렌식 노트북(RAM 최소 32GB 권장)
- 인터넷이 연결된 보조 기계
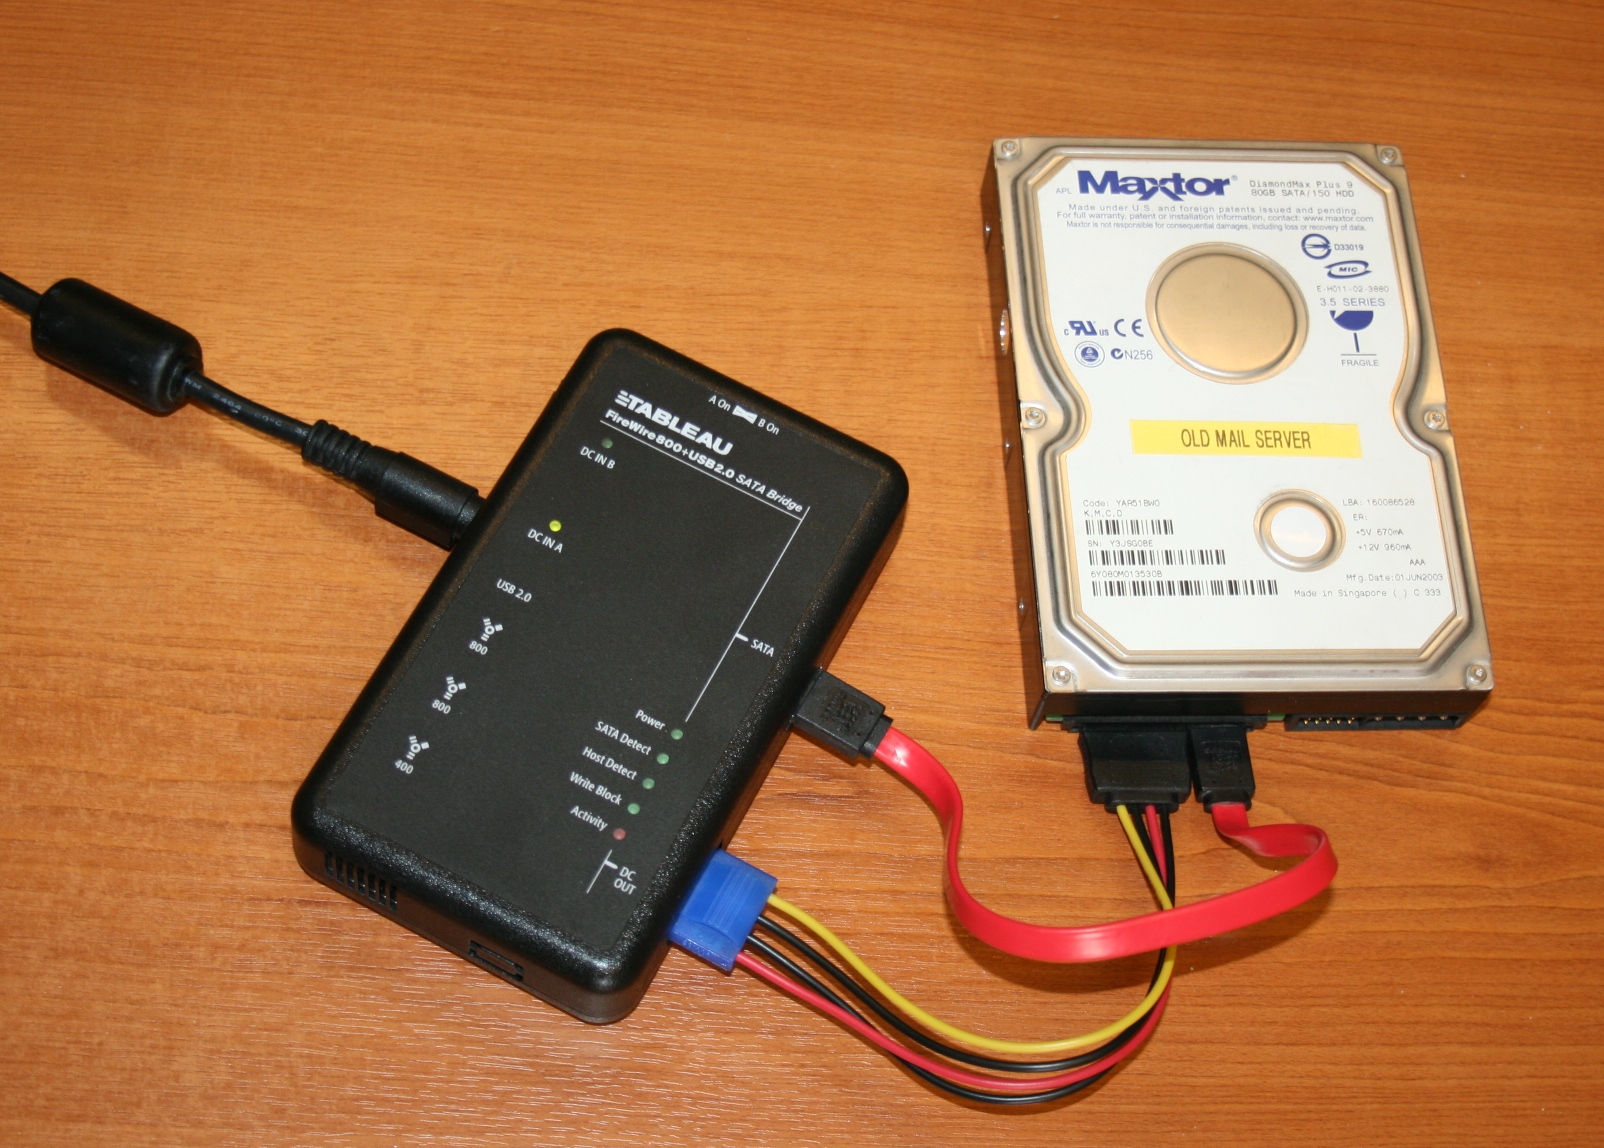
- 물리적 쓰기 차단기

소프트웨어
앞서 말했듯이 디지털 포렌식 컴퓨터에는 많은 DF 도구가 갖춰져야 한다. 가장 많이 사용되는 툴과 운영체제는 다음과 같다.
- 산스 시프트
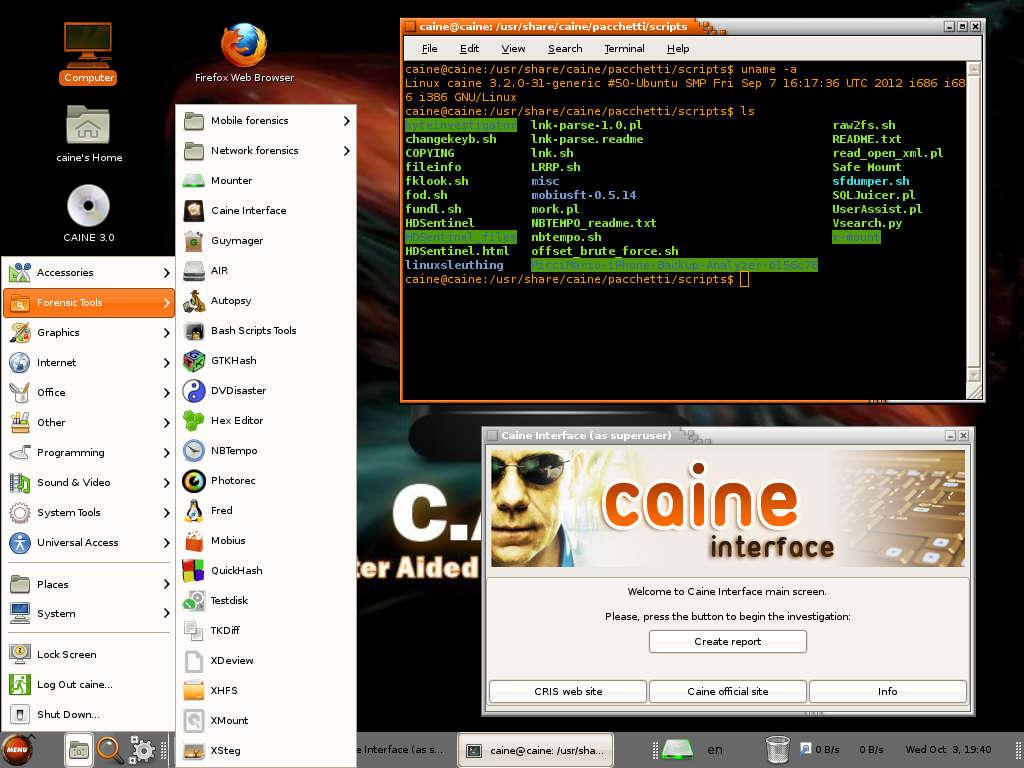
- 케인 OS
- _유능성_
- X-Ways 포렌식
- 부검: 슬루트 키트
- 벌크 추출기

네트워크 증거 수집 및 분석
증거는 조사되어야 할 정보다. 디지털 포렌식 분석가들은 네트워크 기반 증거와 호스트 기반 증거를 포함한 다른 범주의 증거들을 다루고 있다. 네트워크 증거에 대처하는 방법에 대해 알아보자. 앞서 인용했듯이 첫 번째 단계는 증거 수집이다. 네트워킹에서, 우리는 많은 기술과 도구를 사용하여 수집을 수행할 수 있다. 예를 들어 네트워크 다이어그램을 사용하여 증거의 출처를 확인한 후 다음과 같은 패킷 캡처 도구를 사용할 수 있다.
TCPdump

"Tcpdump는 강력한 명령줄 패킷 분석기로, __network traffic__capture용 휴대용 C/C++ 라이브러리 입니다."(출처: tcpdump.org)
와이어 샤크

"와이어샤크는 세계 최고로 널리 사용되는 __네트워크 프로토콜__ 분석기 입니다. 그것은 당신의 네트워크에서 일어나고 있는 일을 현미경으로 볼 수 있게 해주며, 많은 상업 및 비영리 단체들, __정부 기관_ 및 교육 기관들을 아우르는 사실상의 (그리고 종종 de jure)__standard__이다. __Wireshark____development___는 전 세계적으로 네트워킹 ___volution__의 기여 덕분에 번창하고 있으며 1998년 제럴드 콤스가 시작한 __프로젝트__의 연속이다."(출처:__wireshark.org_)
Wireshark를 사용하여 소형 pcap 파일을 분석하는 방법을 시연해 보십시오.
만약 당신이 칼리 리눅스를 사용하고 있다면, 와이어샤크는 이미 그곳에 설치되어 있다.
오픈 와이어샤크

여기서 http_with_jpegs.cap.gz를 분석한다. https://wiki.wireshark.org/SampleCaptures
Wireshark로 파일 열기:

TCP 스트림을 선택하려면 [분석] -\]으로 이동하여 TCP 스트림을 수행하십시오.

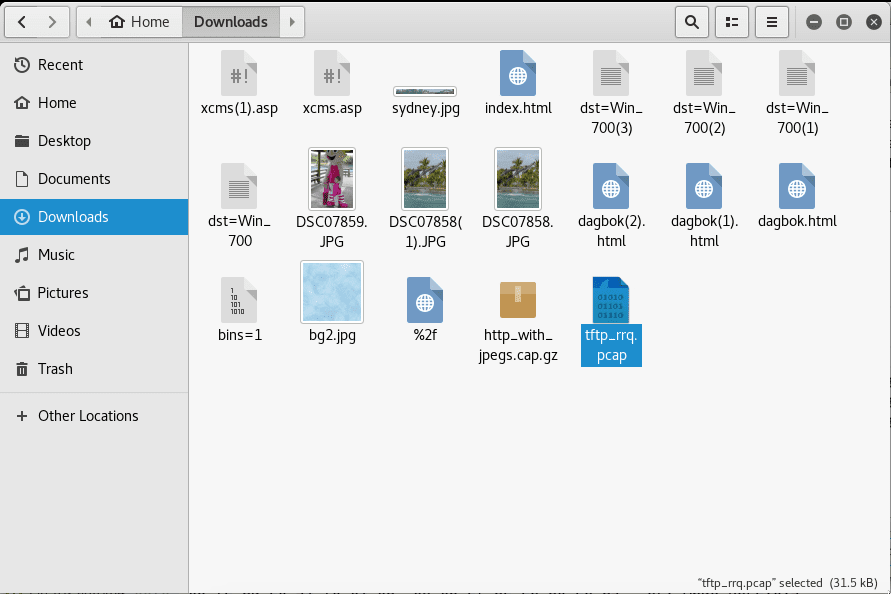
예를 들어, 캡처된 패킷에서 파일을 추출할 경우:
파일 -\> 내보내기 오브젝트 -\> HTTP -\] 저장으로 이동

짜잔! 우리는 포함된 파일들을 추출했다.

호스트 기반 증거 수집 및 분석
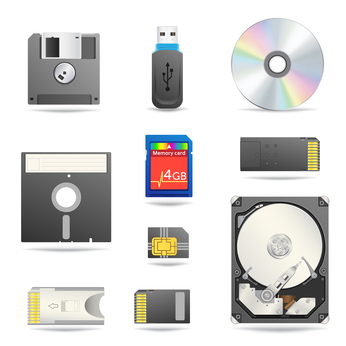
조사관 및 디지털 포렌식 전문가로서 다양한 스토리지 수단과 파일 시스템에 대한 지식을 습득하는 것이 필수적이다. 정의상 저장 매체는 우리가 데이터와 정보를 저장할 수 있는 장치다. 다음과 같은 많은 중고 저장 장치가 있다.
- 하드 드라이브
- DVD-ROM
- USB 드라이브
- _메모리 카드 등 _

이동식 저장 매체 조각은 특정 파일 시스템으로 포맷해야 한다. 가장 많이 사용되는 파일 시스템 중 일부는 다음과 같다.
- Ext4
- Ext3
- NTFS
- FAT32
호스트 기반 증거를 수집하려면 휘발성 데이터와 비휘발성 데이터의 차이를 알아야 한다. 휘발성 데이터는 시스템 종료 또는 일부 시스템 변경 후 손실되는 데이터다. CPU 데이터와 ARP 캐시는 휘발성 데이터의 일부 형태다. 하드 드라이브 및 MFT(Master File Table) 항목에 저장된 데이터는 비휘발성 데이터다. 호스트 기반 증거 인수는 로컬 또는 원격으로 수행할 수 있다. 또한 온라인이나 오프라인에서도 할 수 있다. 증거 수집은 우리가 "Fornsics Imaging"이라고 부르는 것으로 수행된다.
포렌식 이미징
포렌식 이미지는 디지털 포렌식에서 매우 중요한 작업이다. 영상촬영은 증거를 보호하고 그것이 적절하게 처리되었는지 확인하는 것이 매우 중요하기 때문에 파일을 빠뜨리지 않고 무결성을 보장하면서 세심하게 데이터를 복사하는 것이다. 정상적인 파일 복사와 이미징에는 차이가 있는 이유다. 이미징이 전체 드라이브를 캡처하는 중. 드라이브를 영상화할 때 분석가는 마스터 부트 레코드를 포함한 전체 물리적 볼륨을 이미징한다. 두 가지 이미징 기법이 있다.
- 실시간 영상촬영: 손상된 시스템이 오프라인 상태가 아님
- 비활성 이미징: 손상된 시스템이 오프라인 상태임
또한 촬영된 이미지는 다음과 같은 다양한 형식일 수 있다.
- 원시 이미지
- EnCase 증거 파일
- AFF
- 스마트 등
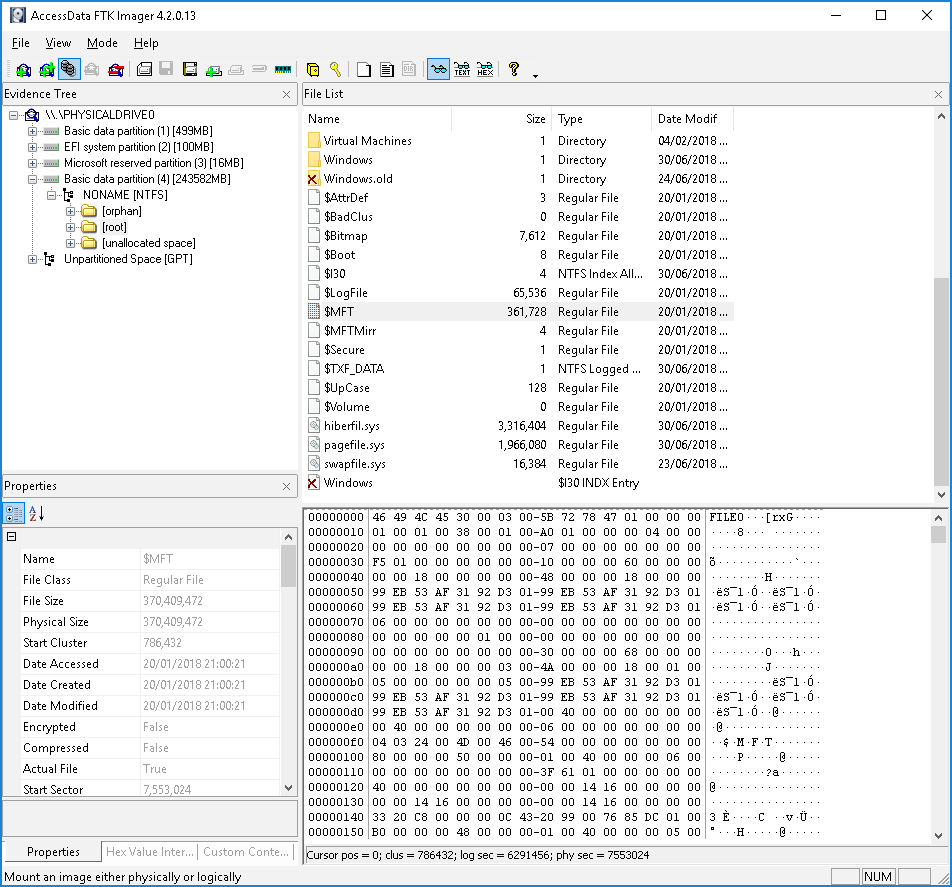
이미징의 경우 FTK 이미저를 사용할 수 있음:
FTK Imager는 원본 증거를 변경하지 않고 데이터 사본을 만들어 __예측적으로__ 건전하게 데이터(증거)를 획득하는 데 사용되는 데이터 미리보기 및 이미징__tool_이다.

실습 1: 부검 포렌식 브라우저
두 번째 시연으로, 우리는 "Autronic Forganics Browser"라는 훌륭한 과학 수사 도구를 사용하는 방법을 배울 것이다. https://www.linuxlinks.com/autopsy/에 따르면:
부검 __Fornsic____Browser__은 The Sleuth Kit의 ___command line__digital__seurvey_ 도구들에 대한 그래픽 ___interface_이다. 두 사람은 '파일 관리자' 스타일 인터페이스에서 __NTFS__ , _FAT_ , UFS1/2 및 Ext2/3을 포함한 볼륨과 파일 _systems__를 함께 조사하고 _key____word_ 검색을 수행할 수 있도록 한다.
Kali Linux를 사용하는 경우 설치할 필요 없이 바로 찾을 수 있음:
메뉴에서 실행:

이동:
http://localhost:9999/autopsy

새 사례 만들기:

프로파일 선택

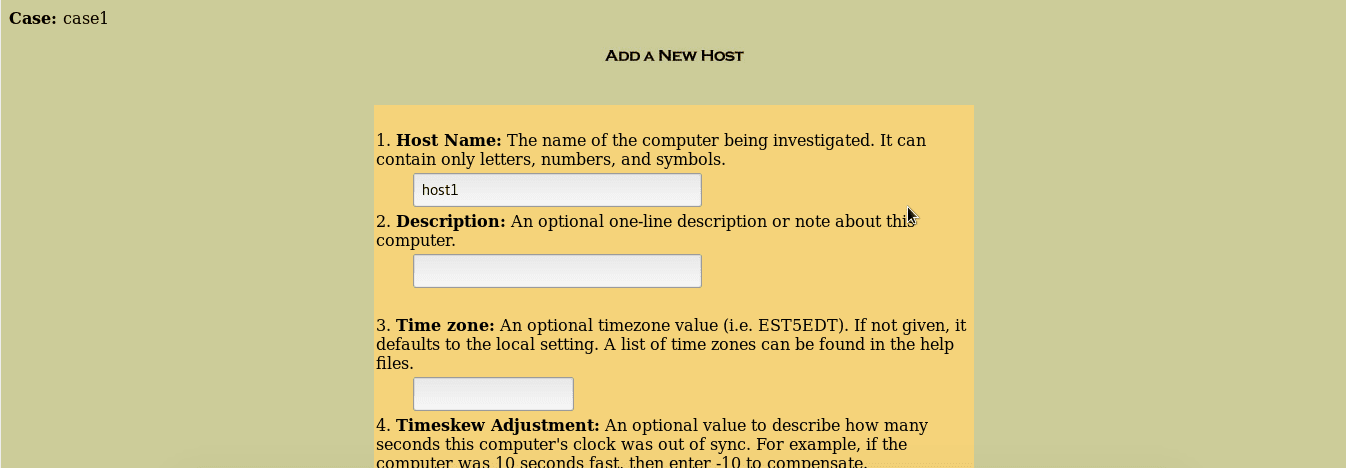
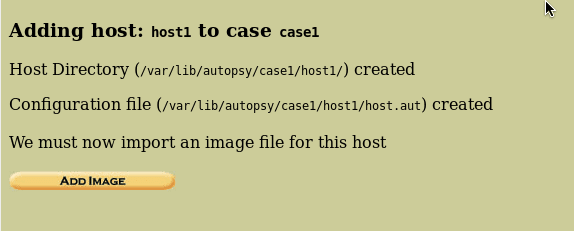
호스트 추가

구성을 확인하고 이미지 추가를 누르십시오.

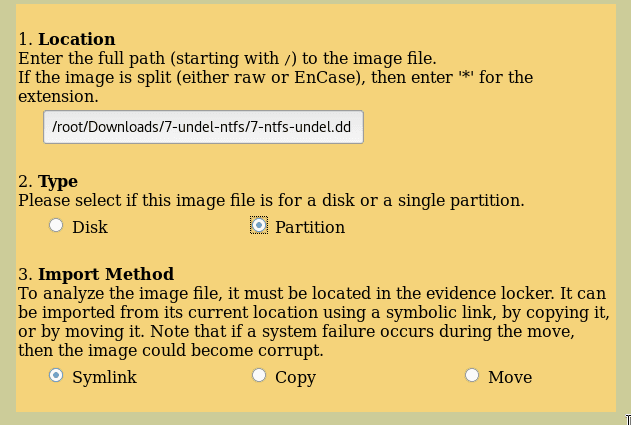
데모에서는 http://dftt.sourceforge.net(디지털 포렌식 도구 테스트 이미지)의 메모리 덤프 샘플(NTFS Undelete)을 사용할 예정이다.

덤프의 경로 추가:

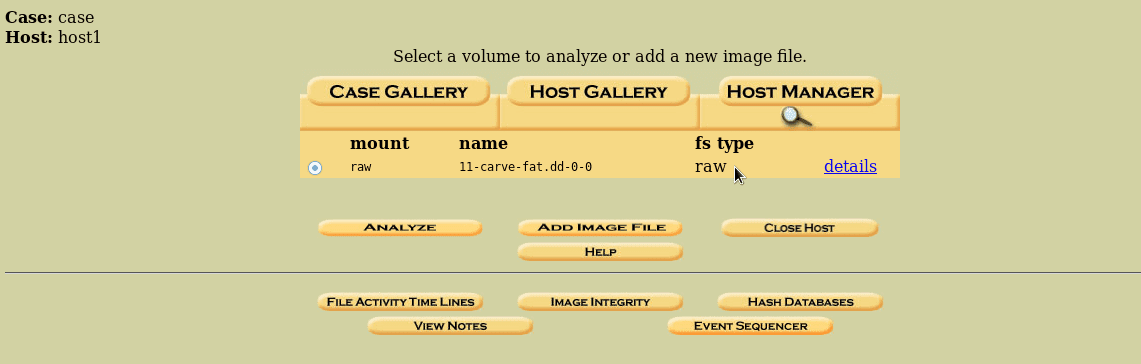
분석 클릭:

이것들은 쓰레기통에 관한 정보들이다.

이제 자유롭게 파일을 분석할 수 있다.

실습 2: 변동성을 고려한 메모리 분석
메모리 악성 프로그램 분석은 디지털 조사와 악성 프로그램 분석에 널리 사용된다. 악성코드를 실행한 후 대상 시스템에서 덤핑된 메모리 이미지를 분석하여 네트워크 정보, 실행 프로세스, API 후크, 커널 로딩 모듈, Bash history 등 여러 가지 전문적 자료를 획득하는 행위를 말한다... 멀웨어 기능을 보다 명확하게 이해하는 것이 항상 좋은 생각이기 때문에 이 단계가 매우 중요하다.
- 프로세스 목록 및 관련 스레드
- 네트워킹 정보 및 인터페이스(TCP/UDP)
- 숨겨진 모듈을 포함한 커널 모듈
- 커널에서 열린 파일
- 바쉬와 역사를 지휘한다.
- 시스템 호출
- 커널 후크
메모리 분석 Python에서 작성된 오픈 소스 메모리 포렌식 도구인 변동성 프레임워크를 간단히 사용할 수 있다. 그것은 GPL로 이용할 수 있다. 변동성은 메모리 이미지 파일에 대한 기본적인 법의학적 정보를 쉽게 얻을 수 있도록 다양한 플러그인과 다수의 프로필과 함께 제공된다. 다운로드하려면 다음 웹 사이트를 방문하십시오. 변동성 기반 - 오픈 소스 메모리 포렌식 또는 GitHub - 변동성 기반/기능성
실제 작업으로 우리는 감염된 컴퓨터의 메모리 덤프를 변동성으로 분석할 것이다. 당신은 여기서 많은 샘플을 찾을 수 있다: https://github.com/volatilityfoundation/volatility/wiki/Memory-Samples
시연을 위해 "cridex.vmem"이라는 메모리 덤프를 분석한다.
wget http://files.sempersecurus.org/dumps/cridex_memdump.zip
메모리 덤프에 대한 정보 가져오기:
python vol.py -f cridex.vmem imageinfo

프로세스 가져오기
python vol.py -f cridex.vmem psxview

상위/하위 프로세스
sudo python vol.py -f cridex.vmem pstree

숨겨진 프로세스와 종료된 프로세스 가져오기
sudo python vol.py -f cridex.vmem psscan

DLL 가져오기
sudo python vol.py -f cridex.vmem dlllist

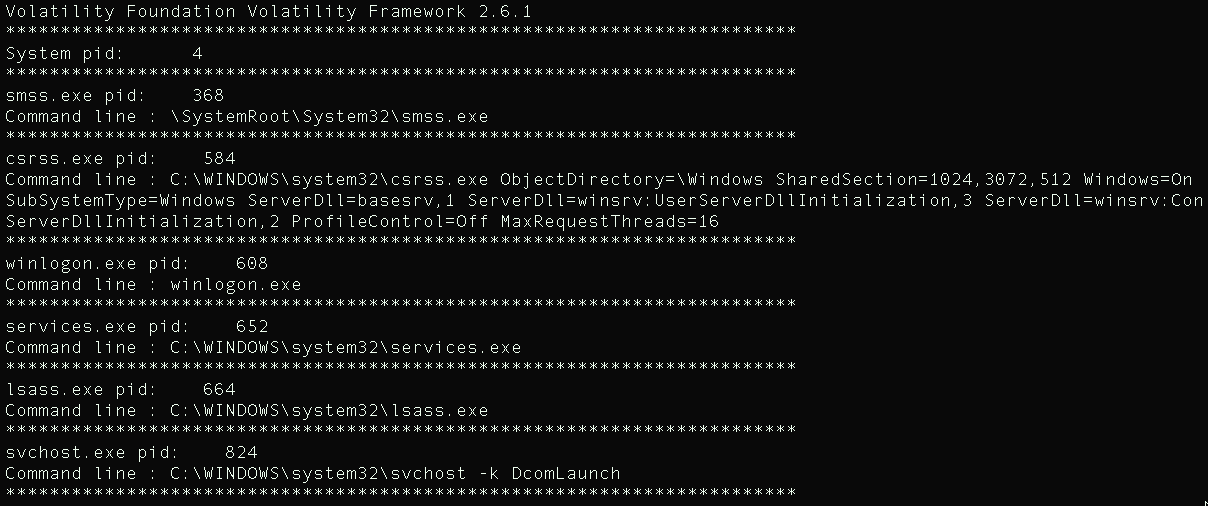
명령줄 아그 가져오기
sudo python vol.py -f cridex.vmem cmdline

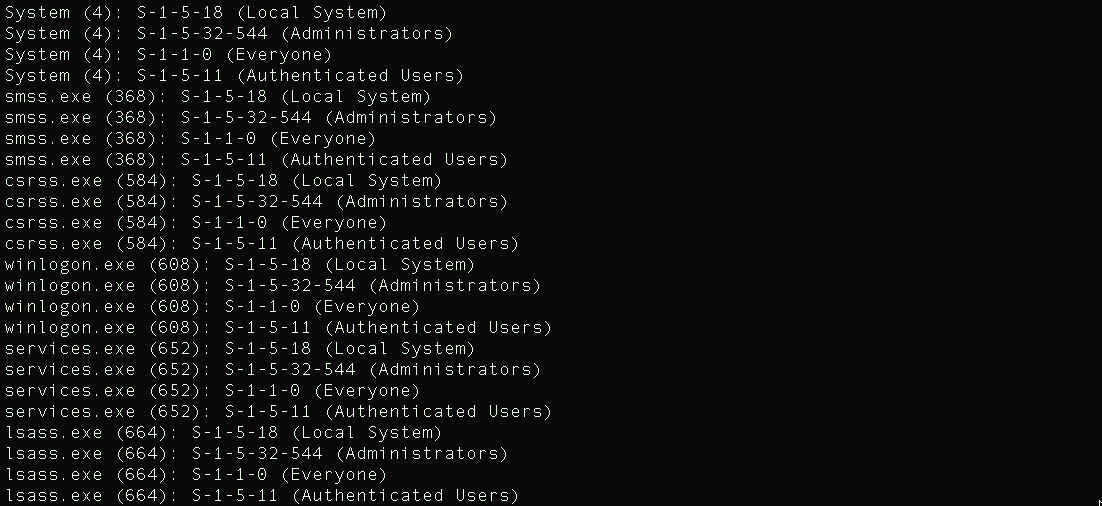
SID 가져오기:
sudo python vol.py -f cridex.vmem getsids

네트워킹 정보:
sudo python vol.py -f cridex.vmem connscan

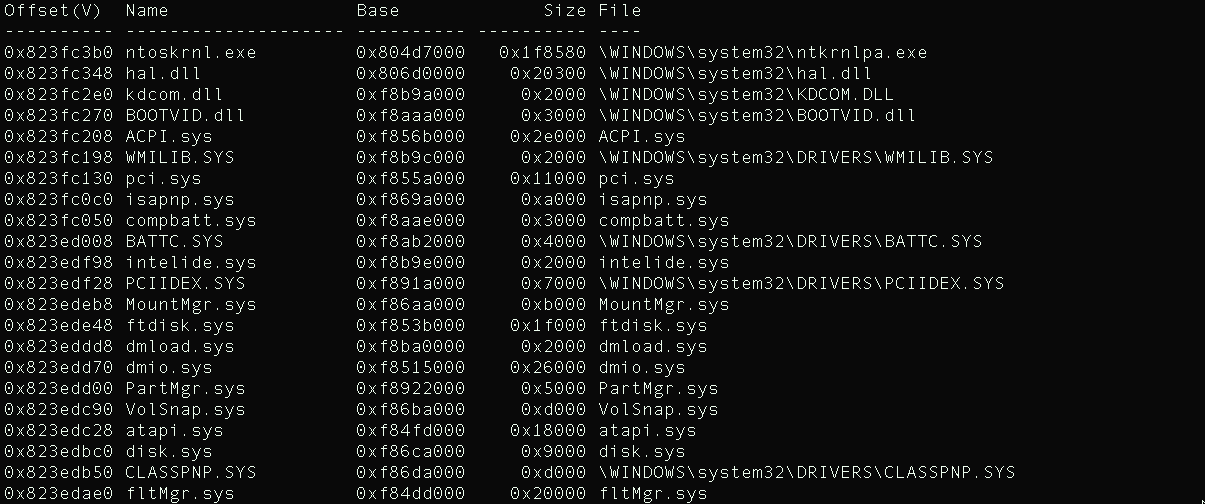
커널 모듈:
sudo python vol.py -f cridex.vmem modules

가장 많이 사용되는 변동성 명령에 대한 자세한 내용은 다음 두 가지 유용한 수법을 참조하십시오.
참조:
요약
본 모듈에서는 디지털 포렌식이라는 것이 무엇인지, 증거 획득과 분석을 포함한 그것을 수행하기 위한 다른 단계는 무엇인지 알아냈다. 나중에 Aschemy(부검) 및 Variability(변동성) 프레임워크를 사용하여 일부 메모리 덤프를 분석하여 잘 알려진 디지털 포렌식 도구를 살펴보았다.
Hands-on Guide to Digital Forensics
Digital forensics is one of the most interesting fields in information security. In this post, we will explore what digital forensics is and we will learn how to perform some digital forensics tasks using some powerful tools and utilities.
In this article we are going to explore the following points:
- Digital Forensics Fundamentals
- Digital Forensics Lab
- Network evidence collection and Analysis
- Host-based evidence collection and Analysis
- Forensics Imaging
- Practical Lab: Autopsy Forensics Browser
- Practical Lab: Memory Analysis with Volatility
Digital Forensics Fundamentals
Before diving into the practical labs it is essential to explain many important terminologies. First, what is digital forensics?
NIST is describing Forensics as the following:
_The most common goal of performing forensics is to gain a better understanding of an event of interest by finding and analyzing the facts related to that event... Forensics may be needed in many different situations, such as evidence collection for legal proceedings and internal disciplinary actions, and handling of malware incidents and unusual operational problems. _
Like any methodological operation, Computer forensic analysis goes through well-defined steps: Identification , Preservation , Collection , Examination , Analysis and Presentation.
let's explore these steps one by one:
- Identification
- Preservation
- Collection
- Examination
- Analysis
- Presentation
According to worldsecuresystems:
"A chain of custody is a document that is borrowed from law enforcement that tracks evidence from the time the Computer Forensics Examiner gains possession of the item until it is released back to the owner. "
The following illustration presents a chain of custody template:

Digital Forensics Lab
To perform digital forensics, obviously, you need to prepare a lab for it. It is essential to have both the required hardware and software.
Hardware
During investigations, digital forensics experts are dealing with many hardware pieces and devices including RAMs and Storagemedia devices. Thus, it is important to acquire a suitable hardware equipment to perform the task in good condition. Some of the required hardware pieces are the following:
- A digital Forensics laptop (A minimum of 32 GB of RAM is recommended) with an OS that contains the needed digital forensics tools
- A secondary machine with Internet connexion
- A physical write blocker
Software
As I said previously, a digital forensics computer needs to be equipped with many DF tools. Some of the most used tools and operating systems are the following:
- SANS SIFT
- CAINE OS
- _Volatility _
- X-Ways Forensics
- Autopsy: the Sleuth Kit
- Bulk Extractor
Network evidence collection and Analysis
An evidence is the information to be investigated. Digital forensics analysts are dealing with different categories of evidence including network-based evidence and host-based evidence. Let's start exploring how to deal with network evidence. As we cited earlier, the first step is collecting the evidence. In networking, we can perform the collection using many techniques and tools. After identifying the source of evidence using for example network diagrams, you can use packet capture tools such as:
TCPdump

"Tcpdump is a powerful command-line packet analyzer; and __libpcap__ , a portable C/C++ library for __network traffic__ capture." (Source: tcpdump.org)
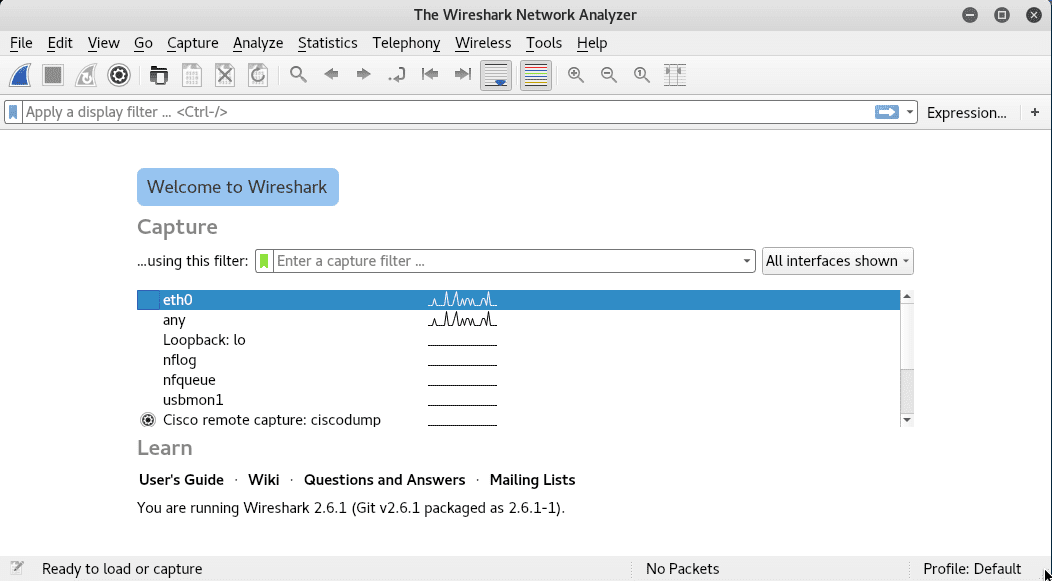
Wireshark

"Wireshark is the world's foremost and widely-used __network protocol__ analyzer. It lets you see what's happening on your network at a microscopic level and is the de facto (and often de jure) __standard__ across many commercial and non-profit __enterprises__ , __government agencies__ , and educational institutions. __Wireshark__ __development__ thrives thanks to the __volunteer__ contributions of networking __experts__ around the globe and is a continuation of a __project__ started by Gerald Combs in 1998". (Source: __wireshark.org__ )
As a demonstration let's explore how to analyse a small pcap file with Wireshark.
If you are using Kali Linux, Wireshark is already installed there.
Open Wireshark
We are going to analyse this Pcap file http_with_jpegs.cap.gz from here: https://wiki.wireshark.org/SampleCaptures
Open the file with Wireshark:
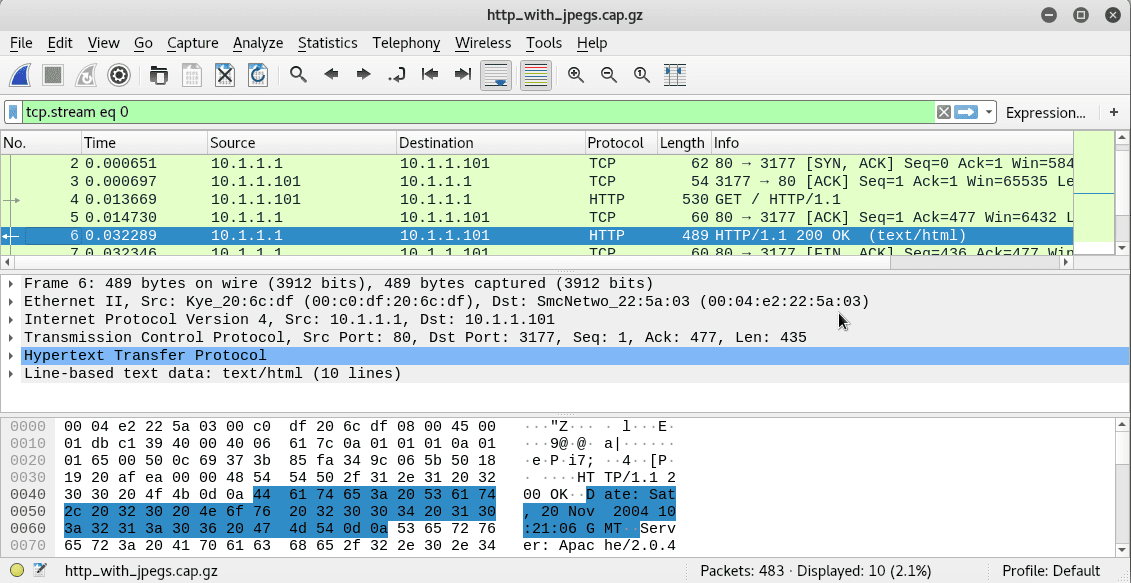
To select a TCP stream go to Analyze -\> follow TCP stream
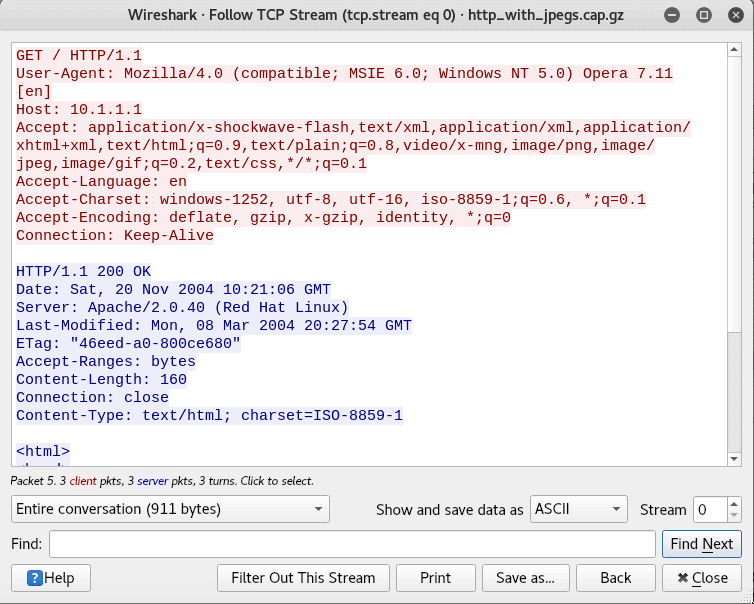
For example, we are going to extract the files from the captured packet:
Go to File -\> Export objects -\> HTTP -\> Save all

Voila! we extracted the included files:
Host-based evidence collection and Analysis
As an investigator and digital forensics expert, it is essential to acquire knowledge about the different storage means and the different filesystems. By definition, a storage media is a device where we can store data and information. There are many used storage devices including:
- Hard drive
- DVD-ROM
- USB drive
- _Memory cards and so on _
The removable storage media pieces need to be formatted with a specific filesystem. Some of the most used filesystems are:
- Ext4
- Ext3
- NTFS
- FAT32
To collect host-based evidence, you need to know the difference between volatile data and non-volatile data. Volatile data is data that is lost after a shutdown or some system changes. CPU data and ARP cache are some forms of volatile data. Data stored in hard drives and Master File Table (MFT) entries are non-volatile data. The host-based evidence acquisition can be done locally or remotely. Also, it can be done online or offline. Evidence collection is performed with what we call "Forensics Imaging"
Forensics Imaging
Forensics imaging is a very important task in digital forensics. Imaging is copying the data carefully with ensuring its integrity and without leaving out a file because it is very critical to protect the evidence and make sure that it is properly handled. That is why there is a difference between normal file copying and imaging. Imaging is capturing the entire drive. When imaging the drive, the analyst image the entire physical volume including the master boot record. There are two imaging techniques:
- Live imaging: the compromised system is not-offline
- Dead imaging: the compromised system is offline
Also, the taken images can be in many formats such as:
- Raw images
- EnCase evidence files
- AFF
- Smart and so on
For imaging, you can use FTK Imager:
"FTK Imager is a data preview and imaging __tool__ used to acquire data (evidence) in a __forensically__ sound manner by creating copies of data without making changes to the original evidence."
Practical Lab 1: Autopsy Forensics Browser
As a second demonstration, we are going to learn how to use a great forensics tool called "Autopsy Forensics Browser". According to https://www.linuxlinks.com/autopsy/ :
The Autopsy __Forensic__ __Browser__ is a graphical __interface__ to the __command line__ digital __investigation__ tools in The Sleuth Kit. The two together enable __users__ to investigate volumes and file __systems__ including __NTFS__ , __FAT__ , UFS1/2, and Ext2/3 in a 'File Manager' style interface and perform __key__ __word__ searches.
If you are using Kali Linux, can found it directly there without the need to install it:
Run it from the menu:
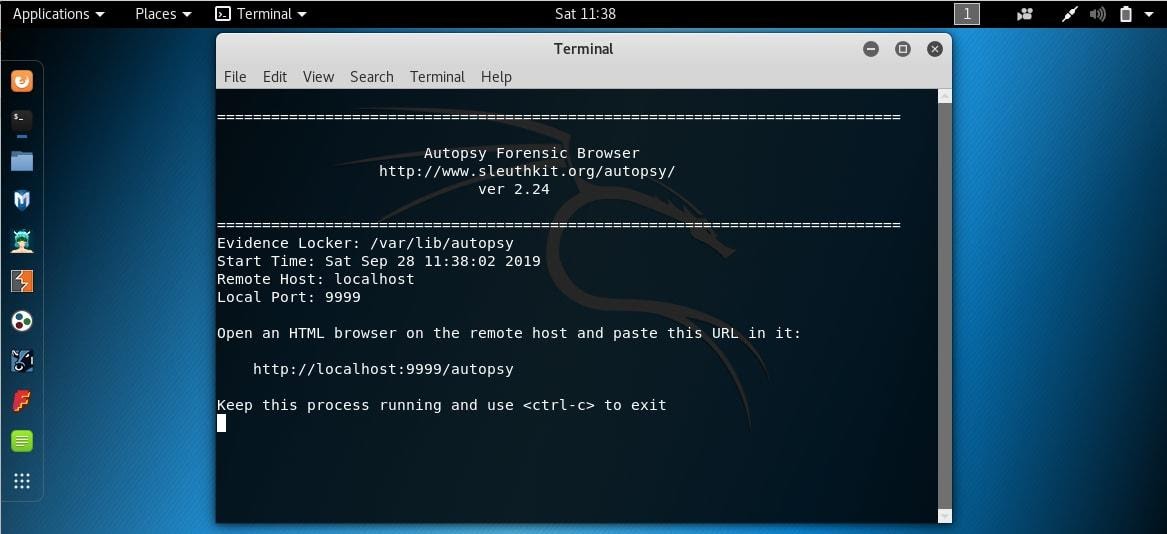
Go to:
http://localhost:9999/autopsy

Create a new case:
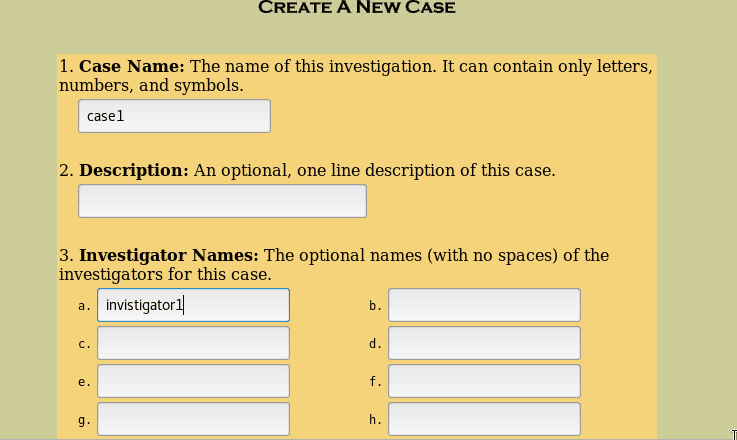
Select the profile

Add a host
Check the configuration and click Add Image
For the demo, we are going to use a memory dump sample (NTFS Undelete) from http://dftt.sourceforge.net (Digital Forensics Tool Testing Images)

Add the path of the dump:
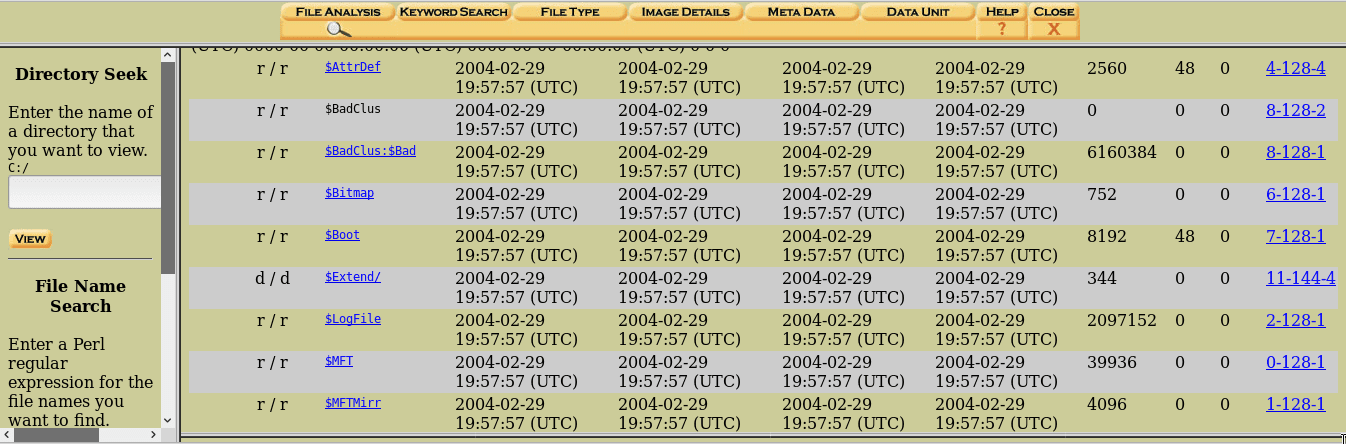
Click on Analyze:
These are some pieces of information about the dump
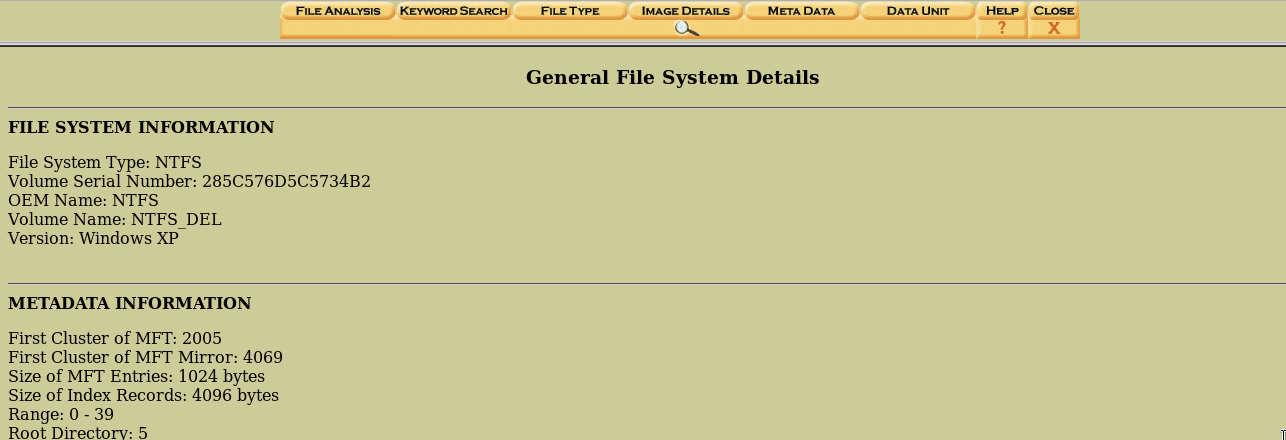
Now you can analyse the file freely:
Practical Lab 2: Memory Analysis with Volatility
Memory malware analysis is widely used for digital investigation and malware analysis. It refers to the act of analysing a dumped memory image from a targeted machine after executing the malware to obtain multiple numbers of artefacts including network information, running processes, API hooks, kernel loaded modules, Bash history, etc. ... This phase is very important because it is always a good idea to have a clearer understanding of malware capabilities.
- Process list and the associated threads
- Networking information and interfaces (TCP/UDP)
- Kernel modules including the hidden modules
- Opened files in the kernel
- Bash and commands history
- System Calls
- Kernel hooks
To analyse memory You can simply use volatility framework, which is an open-source memory forensics tool written in Python. It is available under GPL. Volatility comes with various plugins and a number of profiles to ease obtaining basic forensic information about memory image files. To download it you can visit this website: The Volatility Foundation - Open Source Memory Forensics or GitHub - volatilityfoundation/volatility
As a hands-on practice, we are going to analyse a memory dump from an infected computer with Volatility. You can find many samples here: https://github.com/volatilityfoundation/volatility/wiki/Memory-Samples
For the demonstration, we are going to analyse a memory dump called " cridex.vmem"
wget http://files.sempersecurus.org/dumps/cridex_memdump.zip
Get info about the memory dump:
python vol.py -f cridex.vmem imageinfo

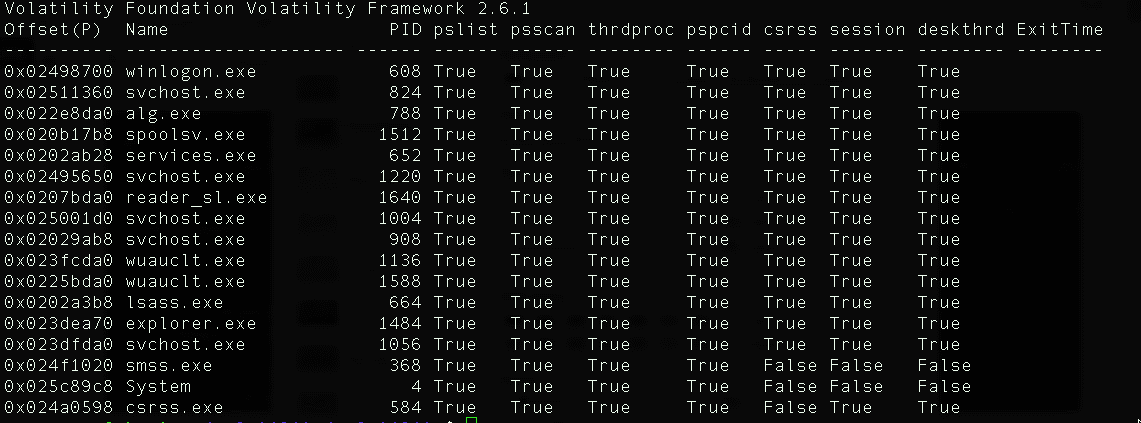
Get Processes
python vol.py -f cridex.vmem psxview
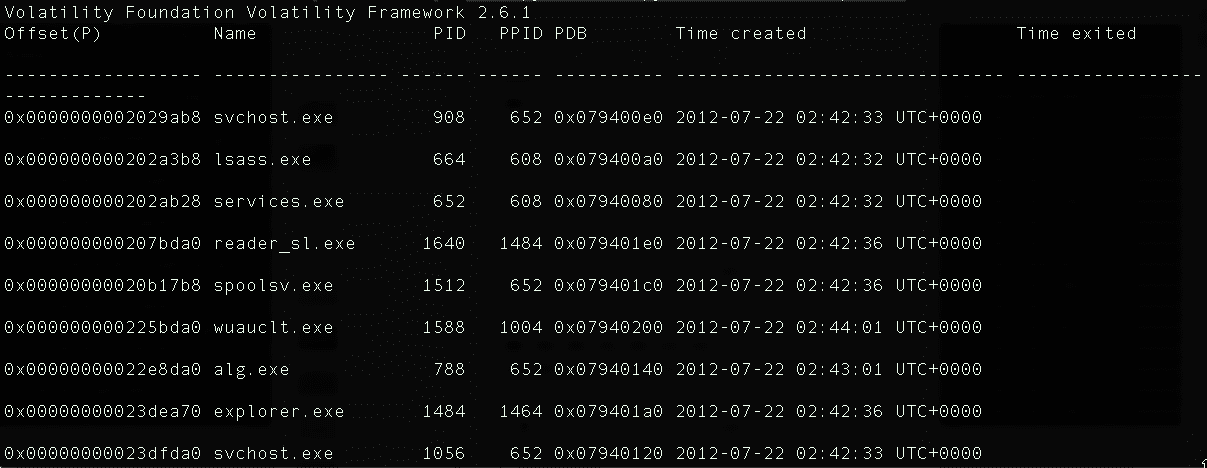
Processes as Parent/Child
sudo python vol.py -f cridex.vmem pstree
Get hidden and terminated Processes
sudo python vol.py -f cridex.vmem psscan

Get DLLs
sudo python vol.py -f cridex.vmem dlllist
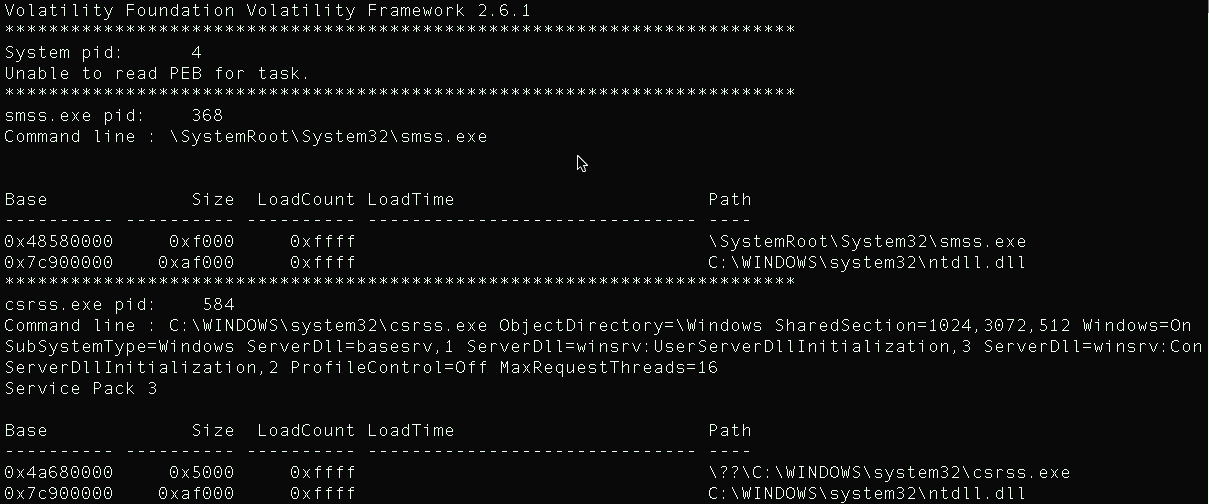
Get commandline args
sudo python vol.py -f cridex.vmem cmdline
Get SIDs:
sudo python vol.py -f cridex.vmem getsids
Networking information:
sudo python vol.py -f cridex.vmem connscan

Kernel modules:
sudo python vol.py -f cridex.vmem modules
For more information about the most used Volatility commands check these two helpful cheatsheets:
References:
- https://wiki.wireshark.org/SampleCaptures
- Digital Forensics and Incident Response
- Digital Forensics with Kali Linux
Summary
In this module, we discovered what digital forensics is, what are the different steps to perform it, including evidence acquisition and analysis. Later, we explored some well-known digital forensics tools by analyzing some memory dumps using Autopsy and Volatility framework.
※ 출처 : Blue Teams Academy | www.blueteamsacademy.com/digital-forensics/
'OffSec' 카테고리의 다른 글
| [Blue Teams Academy] 모듈 16 - Yara 규칙을 사용하여 멀웨어를 탐지하는 방법 (0) | 2021.03.19 |
|---|---|
| [Blue Teams Academy] 모듈 15 - Radare2로 정적 멀웨어 분석을 수행하는 방법 (0) | 2021.03.19 |
| [Blue Teams Academy] 모듈 13 - Wireshark를 사용한 직접적 악성 트래픽 분석 (0) | 2021.03.18 |
| [Blue Teams Academy] 모듈 12 - MITRE ATT&CK를 사용하여 지능적 영구적 위협으로부터 방어 (0) | 2021.03.18 |
| [Blue Teams Academy] 모듈 11 - Shodan으로 OSINT를 수행하는 방법 (0) | 2021.03.18 |


댓글